Have you ever had a document that you can’t edit, or one in which you can modify it but not save the changes to the original files, leaving you with only the option of saving it as a new file? You might be wondering why this happens. As for what causes a Word document to become ‘read-only’?
Situations like this mostly happen due to multiple reasons:
- A Word document is downloaded directly off the internet, such as an email attachment. Their read-only setting is set by default in MS Word to protect your computer, but you have the option of changing it yourself manually if needed.
- Because of some settings by you or someone else. This is a normal situation too. For example, if you are not the only user who can log in on a computer, others might have made some settings for your Word document, or someone gave you a file with editing restrictions. These restrictions can be easily removed.
- The Word document is saved in an unsafe folder (you can change its location).
- Your antivirus software protects you from potentially opening unsafe files, thus making the document read-only (you can add the file or folder to the exclusion list).
- OneDrive is full (you can check the amount of used space).
- MS Office is not activated (check your account and license status).
To edit and save a Word document that’s in a read-only mode, you need to know how to change the file back to normal. In this article, you’ll learn effective solutions to solve Word document read-only problems.
Disable the “Read-Only” Command in Word Document
The “Read-Only” command is for preventing unintended changes in a Word file. Word files with Read-Only attributes can be read/opened, renamed, or edited but cannot be saved in the original file.
To disable this command, simply follow the steps below:
Step 1. Right-click the document that is in the read-only mode.
Step 2. Select the “Properties” option.
Step 3. Click “General”.
Step 4. Unchecked “Read-only” then click “OK”.
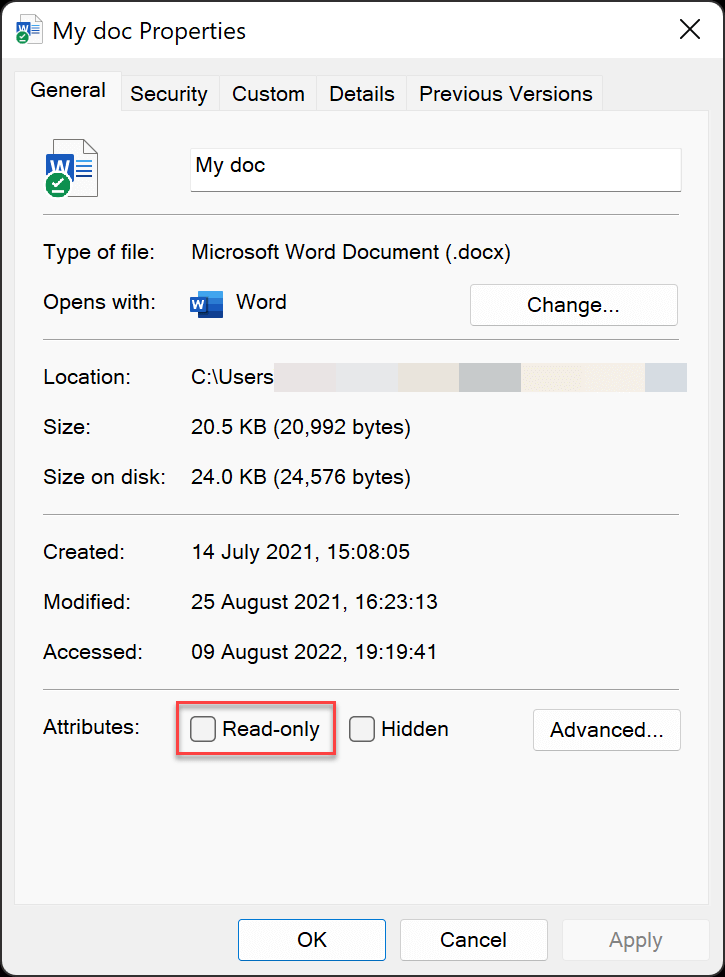
The Word file should now be savable.
Turn Off “Always Open Read-Only”
If your file is set to “Always Open Read-Only”, this means that you’ll have to see the message and manually select the option each time you open the file. Here‘s how to turn off this setting.
To turn off “Always Open Read-Only”:
Step 1. Open the Word document.
Step 2. Click on the “File” tab in the top left corner of the screen.
Step 3. Select “Info” from the menu that appears.
Step 4. Click on “Always Open Read-Only” in the “Protect Document” drop-down to turn the setting from yellow-highlighted to normal.
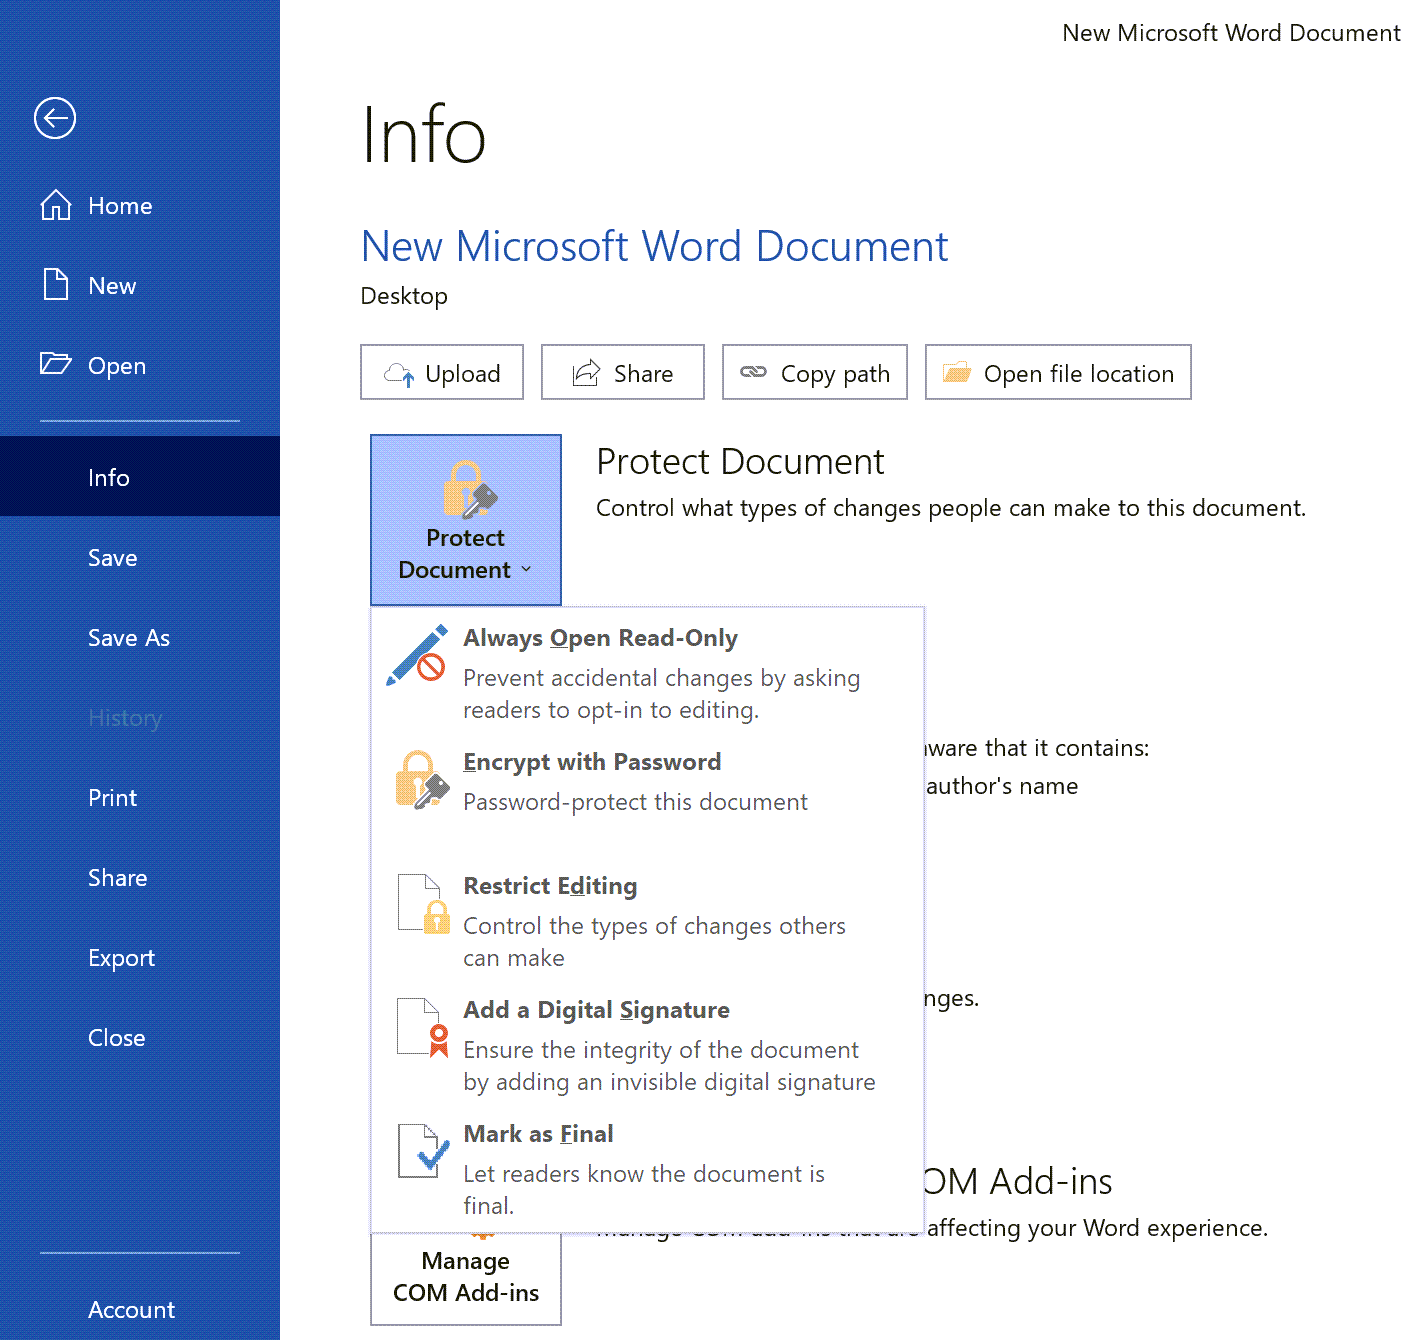
Now, the next time you open this document, you will no longer see the message asking if you want to open read-only.
Disable “Restrict Editing” in Word Document
Microsoft Word’s “Restrict Editing” feature allows you to limit the type of edits and formats that can be made to a document, and by whom. This is useful if you want to prevent someone from accidentally making changes to your document or if you need to collaborate on a document with others but only want certain people to be able to make certain changes.
To disable “Restrict Editing” in a Word document:
Step 1. Open the restricted Word document.
Step 2. Click the “File” option.
Step 3. Click the “Info” option.
Step 4. In the Info option, click the “Protect Document” button.
Step 5. Select the “Restrict Editing” option.
Step 6. Now click the “Stop Protection” button. You may need to enter a password.
If you forgot its password, check out this article: How to Unprotect an MS Word Document for Editing. I use Passper for Word whenever I wanted to remove editing restrictions or recover the opening password in a Word doc.
Free Download
Stop “Marked as Final” in a Word Document
Marked as Final is used to protect sent documents. So, if you get a file from someone that is marked as Final, then you might face problems if you try to edit the document.
Step 1. Double-click the Word document to open.
Step 2. At the top of the word document, click “Edit Anyway”.
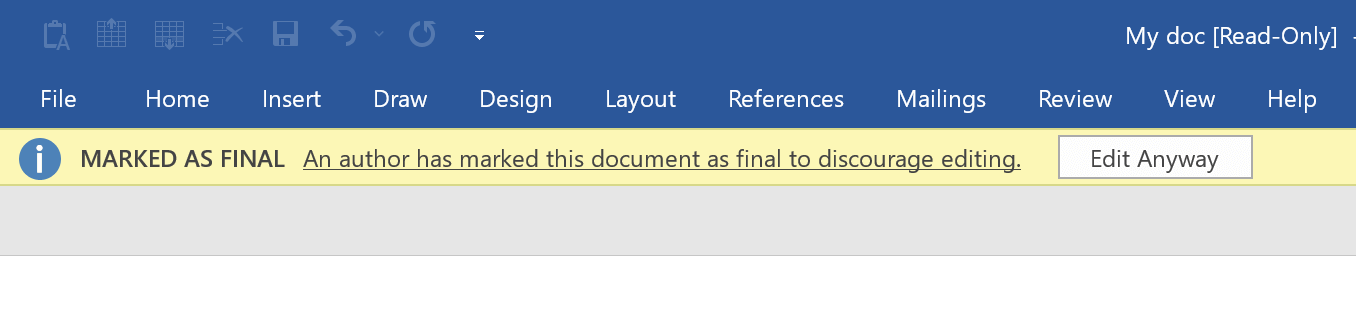
The Word document will refresh and become an editable file.
Disable “Protected View” in Word Document
Protected View is a default option for browser-downloaded Word documents and other email attachments. To help avoid putting risk in your computer, these potentially unsafe files are opened in Protected View.
Word files that are in Protected View status have all editing options hidden and disabled. Simply follow the steps below to disable the protected view default.
Step 1. Find the Word document with “Protected View” status and double-click to open.
Step 2. Find and click “Enable Editing”.

The Word document will refresh and will become an editable file together with access to all editing options.
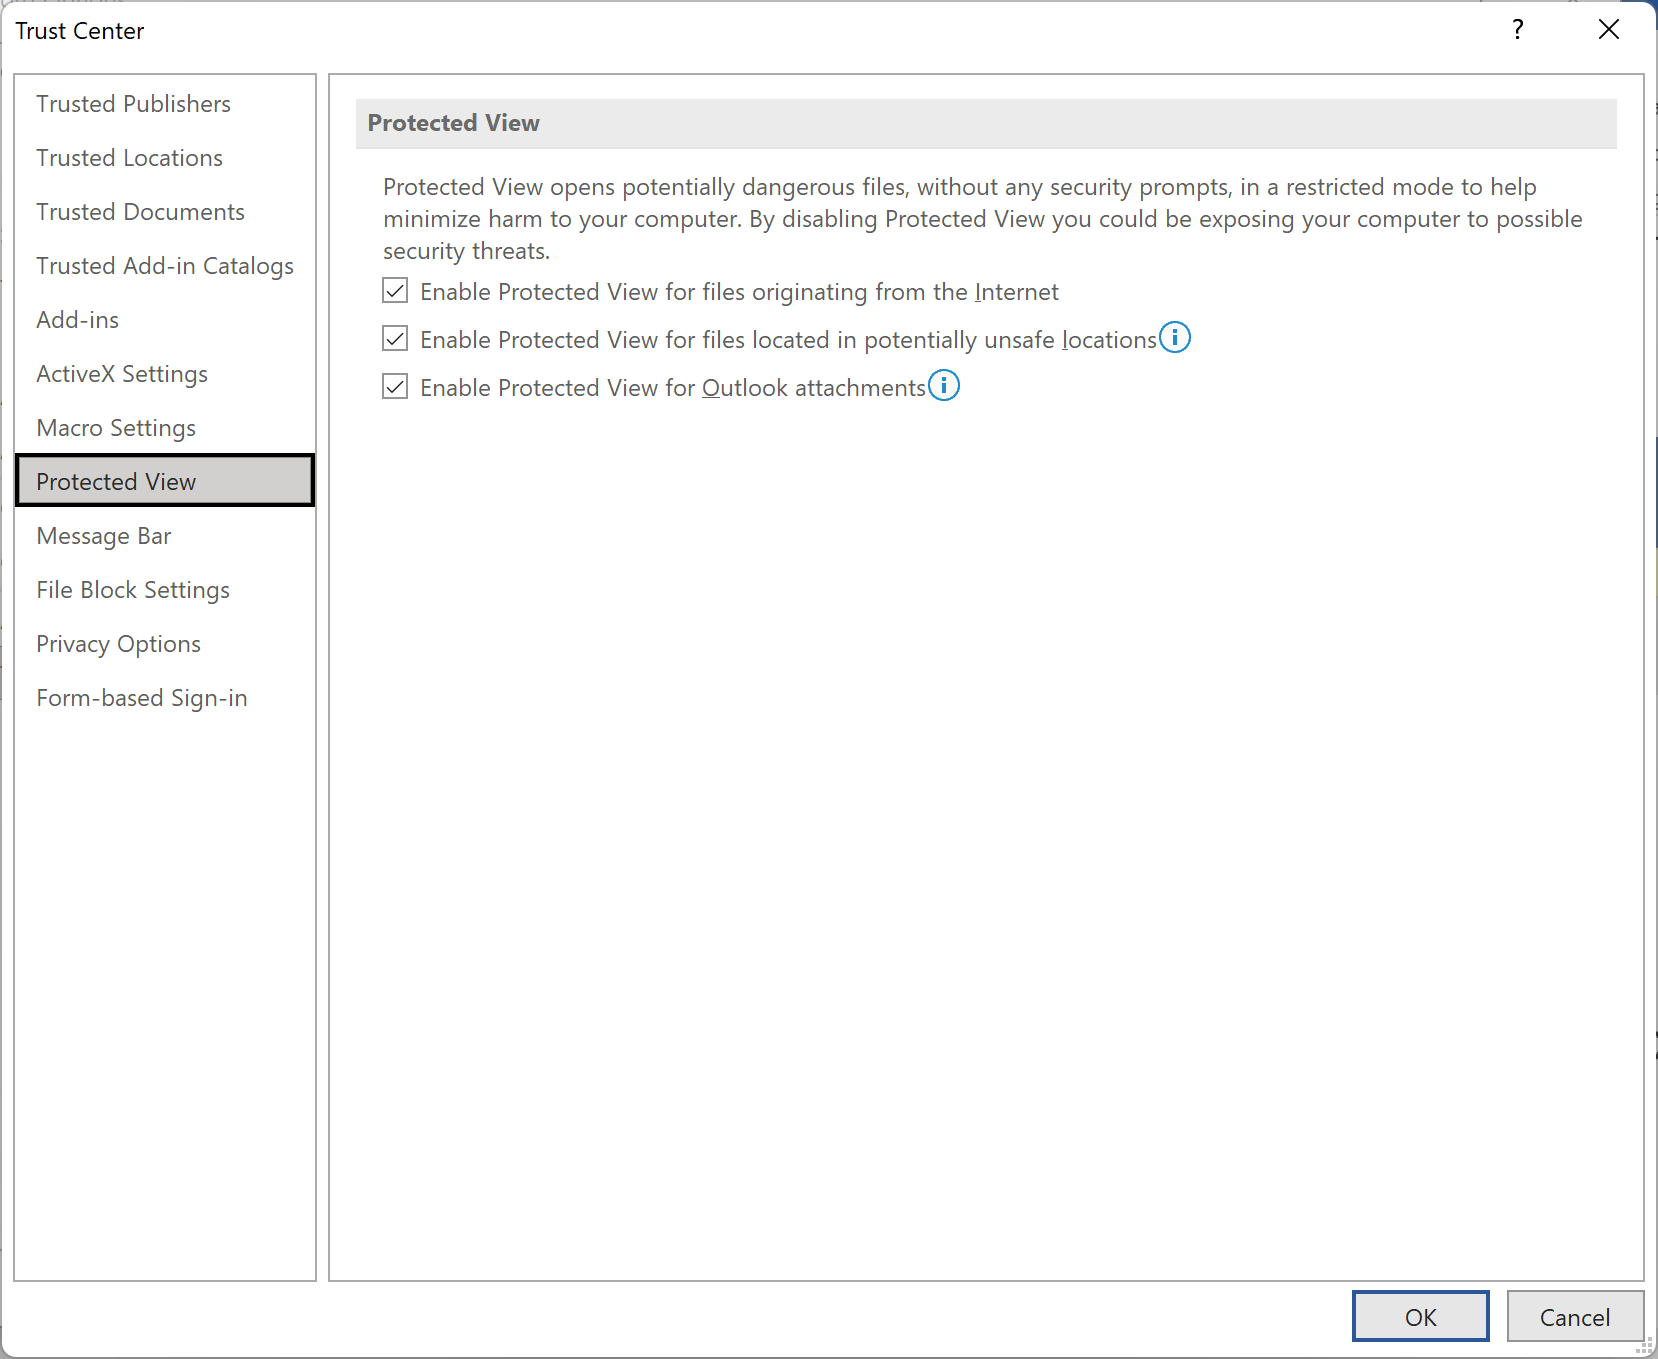
Microsoft Word allows users to turn off Protected View settings in the Trust Center. To do this, open Word and click “File” > “Options” > “Trust Center” > “Trust Center Settings”. In the Protected View tab, uncheck all three options under “Protected View”. This will disable Protected View and allow you to open documents without having to go through the extra step of enabling editing. Keep in mind that disabling Protected View can put your computer at risk for malware and other security threats, so only do this if you trust the source of the documents.
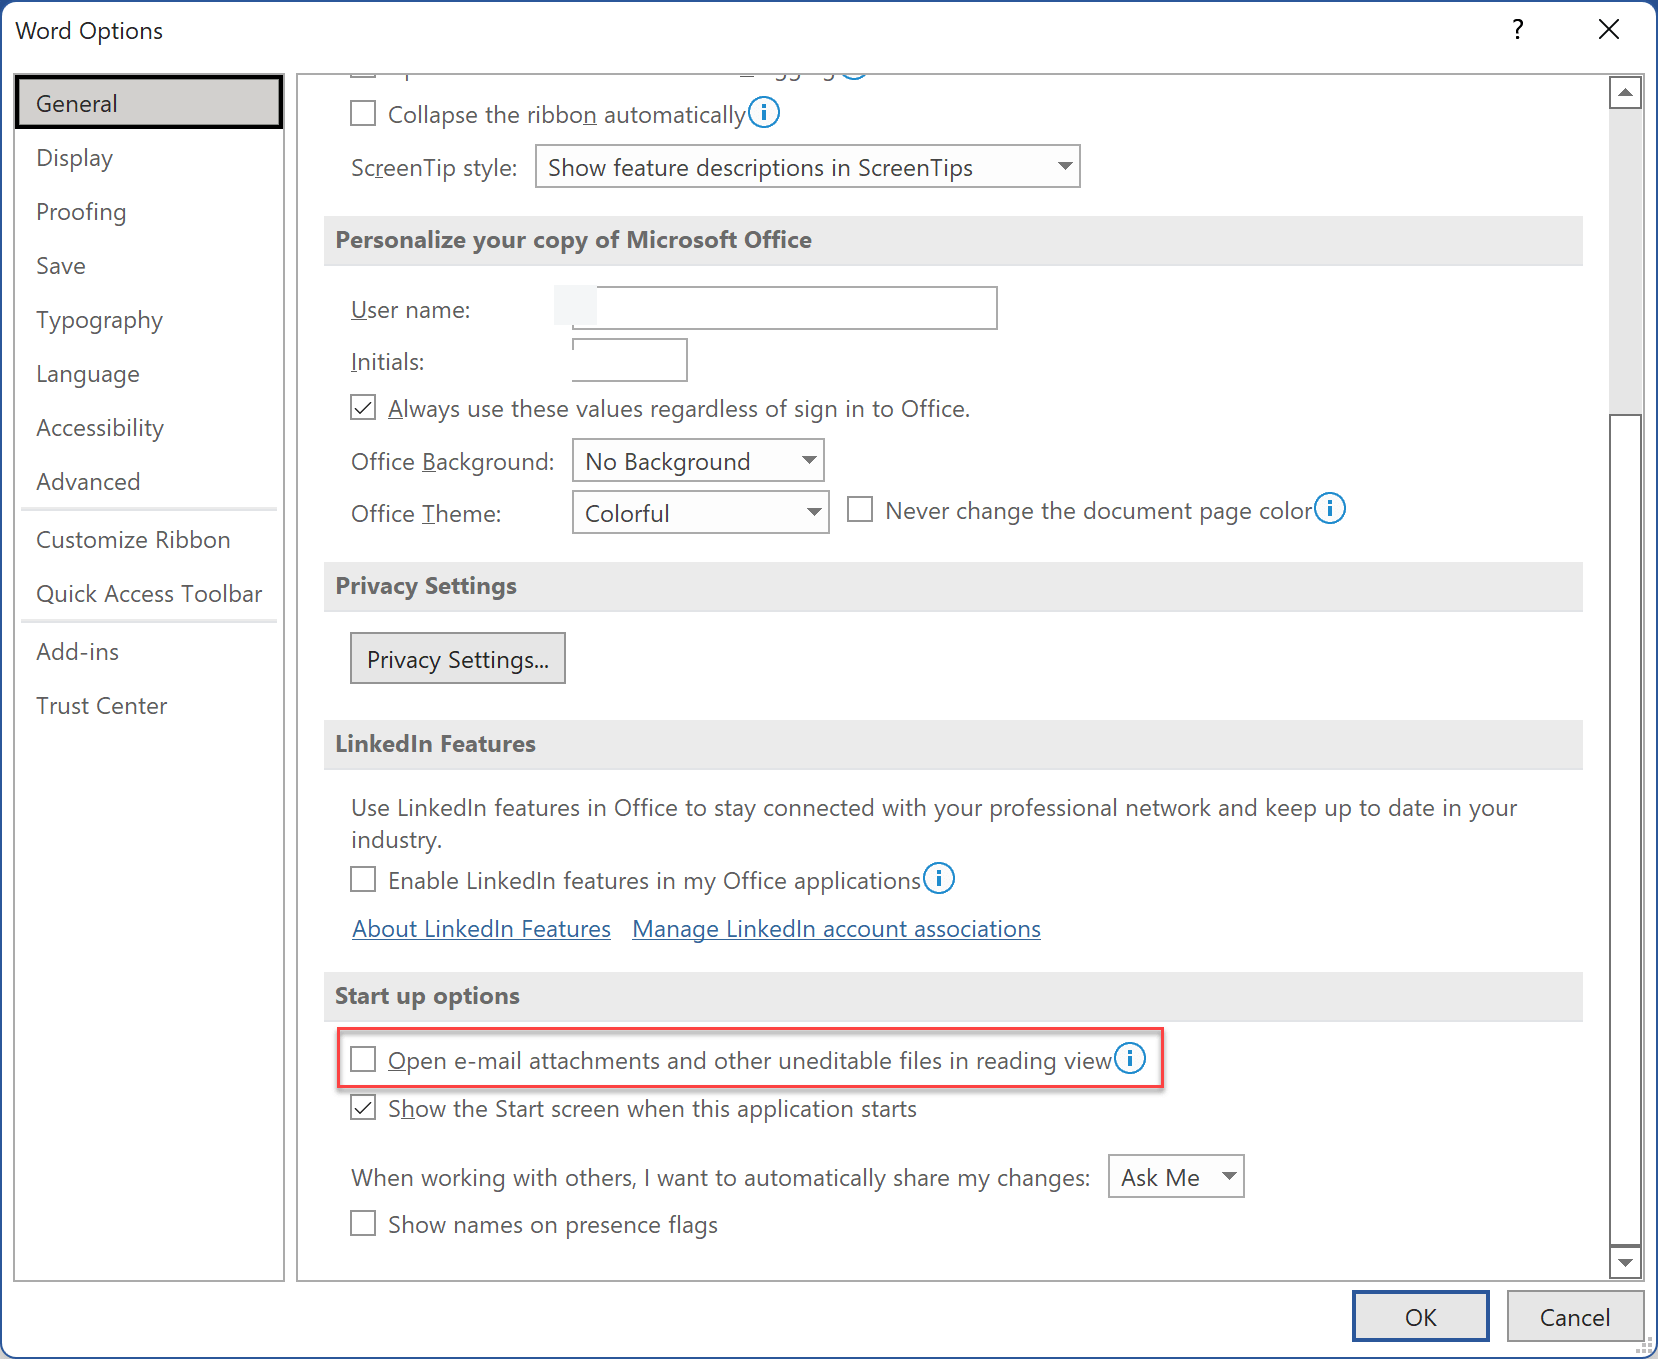
Turn Off “Reading View” in a Word Document
Reading View default is a stripped-down read-only mode and turning it off is simple enough.
Step 1. Click the Word document’s file option.
Step 2. Find and select the “Option” tab.
Step 3. Under the “General” setting, navigate the “Start up options”.
Step 4. Uncheck “Open email attachments and other uneditable files in reading view”.
If you’re using Word in reading mode and want to turn it off, there are a couple of ways to do so. You can either change the view to “Print Layout” or “Web Layout”. Or, you can switch the options in the lower right corner of the Word interface.
Copy and Paste a Word Document
Surely, this copy and paste method won’t remove the read-only protection from the original document. However, you can copy the Word document’s text and paste it into a new Word document you can edit.
To create the copy, follow these procedures:
Step 1. Double-click to open the protected Word document.
Step 2. Click the page and Press Ctrl+A to select the entire text.
Step 3. Copy the selected text using the Ctrl+C shortcut.
Step 4. Click File on the upper-left side of the Word.
Step 5. Click New and click Blank document.
Step 6. Paste the copied document into the new Word sheet. Use shortcuts Ctrl+V.
Step 7. Save the copy as a new file. You’ll be able to edit this Word document.
If these solutions fail you and you still can’t save the file, here are other options you can try:
- Check your OneDrive storage space. Full drive storage can hinder you from saving additional documents. Sign in to your OneDrive account and manage your storage.
- Reactivate your MS Office. Expired subscriptions can reduce the functionality mode of the software.
- Save on a different folder. If you’ve been saving your files in a certain folder, try saving them to your Documents folder this time. See if this makes any difference.
- Check if the Word document is in a ZIP file. Make sure that it is not in it.
- Make sure not to open the document in the Preview pane. To check open Windows Explorer and then go to “View” then select “Panes group” and uncheck the “Preview pane”.
- If possible try to set your anti-virus software to not scan Word files.
Conclusion
Each of us has our own preferred type of document for our day-to-day use. But there are also instances where we have to share documents with/from others. So there’s still that chance that you’ll encounter read-only Word files. If that time comes, you can review the solutions in this article to change a word document from being Read-only to a normal one.